Tuesday, 30 October 2012

As American as Pumpkin Pie!

As Jim Davis, the creator of Garfield once said:
" Vegetables are a must on a diet. I suggest carrot cake, zucchini bread, and pumpkin pie."
 Pumpkin pie is something I have never made before and is perfect for this time of year. Whether you are buying a pumpkin to carve for Halloween or just because they are in season, it is a perfect pie for Autumn. My little man is just beginning to make marks on paper with crayons so I thought I would let him design our pumpkin this year (eg. scribble happily on the pumpkin and I cut it out) I think his efforts are great, even if they don't resemble a face! 

 
Anyway, back to pie! Although more time consuming than making a cake, I think it is worth the effort. When I started my search for a pumpkin pie recipe I discovered loads out there! I decided on this one from Good Food as lots of reviewers said it tasted like a pumpkin egg custard tart, and I would totally agree, yummy!

I actually found, as did other reviewers, that this recipe made more than enough for 1 pie, probably enough for 2, so I have frozen the rest of the pie filling and am going to use it to fill another pie, another day. Alternatively, you could halve the recipe!

Pumpkin Pie

750g/1lb 10oz pumpkin, deseeded and cut into chunks,
350g/14oz sweet shortcrust pastry plus flour for dusting (you have several options when it comes to the pastry, either make your own (recipe below), buy a packet of pastry, or in my lazy case this time, buy a ready made pastry case (I would highly recommend Sainsburys Taste the Difference pastry case))
140g/just shy of 5oz castor sugar,
1/2 tsp salt,
1/2 tsp nutmeg,
1 tsp cinnamon,
2 eggs,
25g butter, melted,
175ml milk,
Icing sugar to decorate (although I found within seconds of this going on my pie absorbed it, yummy but you couldn't tell it was there after about a minute except for on the crust!)
 
1. If you are making your own pastry, make this first (recipe below).
2. Place the pumpkin in a large saucepan, cover with water and bring to the boil. Cook for 15 minutes or until tender, drain and leave to cool.
3. Heat the oven to 180/160 fan/gas mark 4. Roll out the pastry on a lightly floured surface and use it to line a 22cm loose-bottomed tart tin. Put in the fridge to chill for 15 mins. Line the pastry with baking parchment and baking beans, then bake for 15 mins. Remove the beans and paper, and cook for a further 10 mins until the base is pale golden and biscuity. Remove from the oven and allow to cool slightly. 
4. Turn the oven up to 220/200 fan/gas mark 7. 
5. Push the cooled pumpkin through a sieve into a bowl.
6. In a separate bowl, whisk together the sugar, salt, nutmeg, cinnamon, eggs, butter and milk.
7. Combine with the pumpkin puree and pour into the pastry case.
8. Bake for 10 minutes and then turn down the heat to 180/160 fan/gas 4. Continue to bake for 30-40 minutes until the filling has just set (it shouldn't wobble when you give it a gentle shake).
9. Once cool, dust with icing sugar.
Please excuse in the picture where my little man put his finger in the middle of the pie, I did tell him he isn't Little Jack Horner!
 
Mary Berry's Shortcrust Pastry
 
175g/6oz plain flour,
100g/3½oz cold butter, cut into small cubes,
25g/1oz icing sugar,
1 free-range egg yolk
1 tbsp cold water,

1. Put the flour, butter and icing sugar into a food processor and pulse until it looks like breadcrumbs.
2. Add the egg yolk and water and pulse until it starts to clump together.
3. Turn out onto the worksurface and bring together into a ball.
4. Knead it a few times until smooth and then wrap in parchment paper/cling film and chill in the fridge for 15 minutes.

This pie would be perfect for either a dinner pudding warmed through and served with icecream, or an afternoon tea treat! I've just enjoyed my slice on the sofa, in my PJs, with a scoop of vanilla icecream!
 

If you haven't already, please check out, like and share my facebook page:

Happy baking!
xxx


Monday, 29 October 2012

Christmas Cake Truffles!

Just spent a lovely evening with some of my wonderful friends, old and new, learning how to make Christmas Cake Truffles, that can also be turned into cake pops, with the lovely Jo from Peek-A-Boo Cakes, organised by Make Horsham as part of their Homemade Christmas workshop sessions. These evenings are always great fun and everyone is made to feel so welcome, whatever their ability level. Giggles (and tonight delicious cookies which I need to get the recipe for) are had by all and you come away having learnt a new skill in a fun and friendly environment!

I initially thought these would be really hard to do, but Jo broke it down into easy to manage steps and apart from my disastrous bauble, I am really pleased with mine (even my snowman that looks like he came from the Nightmare Before Christmas)! To make cake truffles/cake pops, crumbs of cake (home baked, shop bought, new, stale- all work great) are mixed with buttercream until they can be rolled into balls. The proccess caused lots of giggles, see the picture below and make of it what you will! I can't imagine what they found so funny!


Each of the cake truffles had a different Christmas design and we used coloured fondant icing to make all the decorations for these. Luckily, Jo showed us exactly what we needed to make and then we could embellish them, seeing who could make the best fluffy wings, sitting with several artists meant I did not win this one but still think my robin looks really cute!  The cake balls (and one hat shape for ours) were then dipped in delicious melted chocolate which unfortunately got on my hands so I had to lick it off! We used milk, white and Candy Melts, which I had heard of but not used before to get the red for the hat! For anyone who is interested, Candy Melts come from America and are Candy Melts by Wilton are colourful candy coatings with the same consistency as chocolate and unless flavoured, taste like white chocolate to me. They don't need to be tempered so can just be melted and are ready to go. 


The Candy Melts were trickier to work with and I defiantely need much more practice to get a smooth finish on mine! My favourite two have to be my robin and Christmas pudding...
They dry nice and quickly so you can peel them off the foil, knock off any spills and voila, lovely Christmas Cake truffles! Of course, I had to test them when I got home, and WOW, they are yummy but to be fair in the style of Joey, cake good, buttercream good, chocolate good! What's not to love!? I will defiantely be making some of these for Christmas pressies this year and with a bit of practice hopefully they will look even better! 
Thanks for a lovely evening!
xxx

Sunday, 28 October 2012

Grasshoppers in a pie?!

Thought I'd share a recipe you could do for Halloween as it can look a ghoulish green, Grasshopper Pie! I'd never heard of this before I saw Nigella make it on TV and knew I just had to try it!! When you take a bite it is like eating wobbly After Eight pie so if you're a fan of mint and chocolate, you'll love this! I actually used the power of Google to find an adaption of her recipe that came from http://www.bristolfoodie.co.uk.
The original recipe uses Creme de Menthe and Creme de Cacao Blanc to flavour the pie but I didn't have these and know they would just sit in our drinks cabinet, so went for 'Bristol Foodie's suggestion of mint essence and it tasted minty fresh!
Nigella's Grasshopper Pie

300g/12oz Bourbon biscuits,
50g/2oz dark chocolate, (I actually don't think this is needed as couldn't tell it was in there! I would just use it for grating on top at the end)
50g/2oz butter,
150g/6oz mini marshmallows,
125ml full fat milk,
1 ½ tablespoons of peppermint essence,
1 ½ tablespoons of Baileys (optional)
375ml double cream
Few spots of green food colouring

1. Put the biscuits, chocolate and butter into a food processor and blitz until malleable. If you don't have a food processor you could bash the biscuits with a rolling pin in a bag and stir them into melted butter.
2. Press into a 25cm tart tin (I used a loose bottom tin as it makes it easy to get it out).
3. Puts the milk and marshmallows in a pan on a low heat, stirring occasionally, until the marshmallows have melted and the mixture is foamy. Don't be tempted to rush this and do it over a high heat or you will stop the marshmallows from setting later and have a runny pie!
4. Add the peppermint essence and put the mixture to the side to cool.
5. Whisk the cream until it is just beginning to make peaks. 
6. Once the marshmallow has cooled, fold it into the cream with a wooden spoon (make sure you do this slowly and gently so the mixture doesn't separate).
7. Add the green colouring to get the shade you desire. I went for a pale green but Nigella prefers full on garish green!!
8. Pour the mixture into the base and then put into the fridge to set for at least 4 hours, preferably overnight.
9. Just before serving grate some dark chocolate on the top.


Hope you enjoy this as much as we did, it seems very wrong but it is very right!!
xxx

Saturday, 27 October 2012

Sarah-Jane and Cathryn from the Great British Bake Off!

I had a lovely early start to my morning, heading down to Horsham market for the first day of Sarah-Jane and Cathryn from the Great British Bake Off's market stall. Packed with beautiful and tempting seasonal biscuits, cakes, tarts and scones it was hard to decide what to buy!! In the end I decided on spiced pumpkin cake, cheddar and chipotle scones, a chocolate cookie, Gruyere ghosts (cheese biscuits) and a little eyeball tart for Halloween (not all for me to eat I will add!). Both Sarah-Jane and Cathryn were just lovely, chatty and so smiley even though it was freezing!! It was lovely to talk to them about the Bake Off, Paul Hollywood (hello!) and Kitchenaids! They are just as lovely as they seemed on the TV!
When I got home I really enjoyed the spiced pumpkin cake for my breakfast! It was perfectly flavoured, and both the sponge and icing was light and fluffy, two thumbs up from Yummy Mummy. Surely having pumpkin in it made it good for me too?! I think I shall have to do some pleading with them for the recipe! The little eyeball tart had caught my eye as a nice little bake for Halloween, a delicious little jam tart (very nice pastry) topped with fondant icing, a really nice idea to make for Halloween parties. I think my little boy will love making these when he's a bit older, for now he's very happy to eat them! 


I will add some more to the blog when I've had sampled the scones, cookie and cheese biscuits, thought it was a bit glutinous, even for me, to eat them all for breakfast! I would really recommend popping down to see them in Horsham market for some scrumptious baking and a good chinwag!

 Thank you for a lovely start to my weekend ladies, wishing you the best of luck with your new business!
xxx

Thursday, 25 October 2012

Remember, remember the 5th of November...

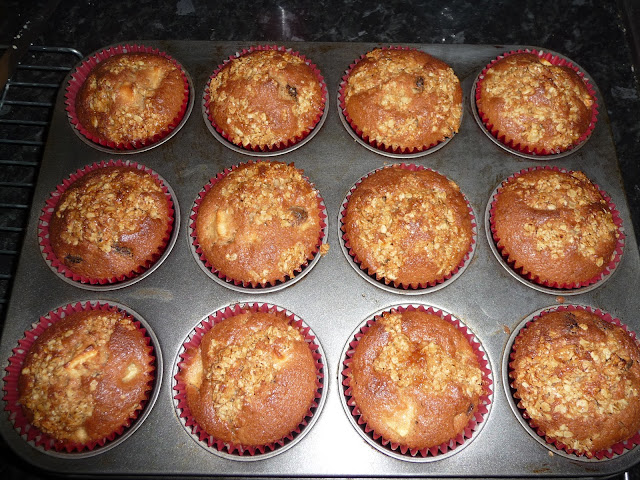
As bonfire night draws near I look forward to baking some warming treats. I came up with these apple and cinnamon muffins as a quick and easy treat made with things from my baking cuboard, to take to our little boy's first firework display tomorrow night. They are yummy just as they are, or could be made into more of a pudding with the addition of some caramel sauce and a scoop of vanilla ice cream! I used three different types of sugar in these, just as I seem to have a crazy amount of different sugars in my baking cupboard but you could easily use just castor sugar. The cake may just not be quite as dark but will still taste yummy!!
Yummy Mummy's Apple and Cinnamon Muffins

6oz/150g of self raising flour,
5oz/125g Stork,
4oz/100g golden castor sugar,
2oz/50g dark brown sugar,
3 large eggs,
1 tsp baking powder,
1 tsp cinnamon,
1/2 tsp mixed spice,
3oz/75g sultanas,
3 apples, peered and cut into small chunks.

For the topping:
1oz Stork, melted,
1oz demerera sugar,
1oz oats.

1. Preheat the oven to 200/180 fan/gas mark 6.
2. Mix together the self raising flour, Stork, golden castor sugar, dark brown sugar, eggs, baking powder, cinnamon and mixed spice.
3. Stir in the sultanas and apples and spoon into large muffin cases.
4. Melt the Stork (I did this in the microwave for 30 seconds to save on washing up!) and stir in the demerera sugar and oats.
5. Use a teaspoon to put a spoonful on top of each cake (it doesn't matter if it isn't too neat as it will melt out to make a crunchy topping when cooked).
6. Bake in the oven for 20-25 minutes until the tops are golden brown and the oat mixture is cooked. I found they look longer than cupcakes as the mixture is thicker due to the fruit.

Hope you enjoy these as much as we do, the two that have disappeared from the cooling rack seem to have hit the spot in our house!
xxx


Wednesday, 24 October 2012

Lavender's blue dilly dilly...

I LOVE shortbread (what's not to like about sugar, flour and butter?!), and  have decided to make some lavender shortbread next week, so lavender sugar is needed! You can buy this, but in my opinion, they charge extortionate amounts for what is just lavender and sugar. So, off I went to Yummy Grandma's garden to raid her lavender bushes, just in the nick of time as it is coming to the end of their season. Happily successful, with a bag of lavender and a bag of sugar, I trotted home to make mine and it smells yummy (as do my hands!)

So if you want to have a go at making some of your own, here's how! There are 2 main methods I could see out there, I went for option 1 as I think it looks much prettier, is much quicker and I'm not adverse to eating flowers! With both methods, you could sieve out the flowers if you don't want to put them into your baking.

Lavender Sugar

1kg castor sugar,
2-4 tbsp lavender flowers (make sure you give them a quick check over to make sure no beasties have hitched a ride! I took the flowers off on a white chopping board so I could see them clearly).

(You can scale this up or down depending on how much you need to make, I actually made half this recipe).

Method 1

1. Weigh out the sugar into a clean glass jar (you need a jar that is slightly bigger so that you can shake the contents).
2. Add the lavender flowers and shake.
3. Leave for a week and then give it a taste, the sugar should be beautifully lavendery (yes I know that isn't a real word).

Method 2

1. Weigh out the sugar into a clean glass jar (you need a jar that is slightly bigger so that you can shake the contents).
 2. Using a spoon, crush the lavender flowers (reserving 1 tbsp for adding to the jar at the end) through a sieve into the sugar. A fine powder should come through into the sugar.
3. Add the reserved flowers and shake.
4. Leave for a week before using.

Hope you enjoy making some lavender sugar ready for some floral baking next week!
xxx


Tuesday, 23 October 2012

Scone then gone!

Was in the mood for a savoury hit today so I headed towards a new recipe from Good Food magazine, Cheese and Onion Chutney scones! The finished results are delicious and SO moreish. The sweet chutney flavour goes perfectly against the deep flavour of the cheddar and they are light and fluffy too! I used a small cutter to do mine so that my little boy could pick them up easily for his lunch but you can make them much bigger if you want! I think they would be perfect with a bowl of tomato soup (which of course, has to be Heinz!)

Cheddar and Caramelised Onion Chutney Scones

225g/8oz self raising flour, plus extra for dusting,
1 tsp cream of tartar,
1/2 tsp bicarbonate of soda,
Pinch of salt,
50g/2oz butter,
100g/4oz strong cheddar cheese grated,
75g/2 1/2oz caramelised onion chutney,
150ml full fat milk,
1 egg, beaten.

1. Heat the oven to 200/180 fan/gas mark 6 and grease two baking trays.
2. Rub the butter into the self raising flour, cream of tartar, bicarbonate of soda and salt.
3. Stir in 85g of the cheese and all of the chutney.
4. Slowly add the milk mixing with a knife until it forms a dough (I would add the milk slowly and you may find you don't need all of it, depending on how runny the chutney you use is).
5. Turn out onto a floured surface and knead briefly before flattening the dough with your hands to about 3cm thickness.
6. Use a cutter to cut out rounds of dough and place them on the greased baking tray, rerolling the dough and cutting again until it is all used up.
7. Brush the tops with the beaten egg and sprinkle the remaining 15g of cheddar on top, gently pressing it down.  
8. Bake for about 10-12 minutes until the cheese on top is golden brown.

I think they are best eaten within minutes of coming out of the oven but can be gently reheated in a low oven. If you want to freeze them, let them cool completely before wrapping them in cling film/film/in an airtight container and freezing. To stop them going soggy when you defrost them place them on a wire rack, covered with a clean tea towel for about an hour and a half to fully thaw. Hope you enjoy these as much as we did!
Post below your ideas for scone flavours, I'm thinking about working on a recipe for goats cheese and walnut scones!
xxx


Monday, 22 October 2012

My Turkish Delights!!

Hello happy readers! I've had a productive day in the Yummy Mummy kitchen, creating my own Turkish Delight cupcakes (inspired by Tash's suggestion). Delicate rose met dark intense chocolate and I am thrilled with the results!
Here is how to make my Turkish Delight cupcakes if you fancy having a go yourself:

Yummy Mummy's Turkish Delight Cupcakes (makes 12 cupcakes, it will make more if you use fairy cake cases)

3 large eggs,
6oz/150g self raising flour,
6oz/150g stork,
3oz/75g castor sugar,
3oz/75g dark brown sugar (to intensify the chocolate taste),
3 heaped desert spoons of good quality cocoa (I always use Green and Blacks),
3 bars of Frys Turkish Delight (although I got 4 so I had one to eat-greedy!),

6oz/150g stork,
12oz/300g icing sugar,
1 tsp rosewater,
Pink food colouring (add slowly to get the depth of colour you desire, I went for a rosy pink),
Some dark chocolate chunks.

1. Preheat the oven to 200/180 fan/gas mark 6.
2.  Mix together the eggs, self raising flour, stork, castor sugar, dark brown sugar and cocoa in a bowl.
3. Cut each Turkish Delight bar into 4
4. Half fill the cake cases with half of cake mixture and put 1 piece of Turkish Delight into each case. The Turkish Delight will sink to the bottom of the cake as it cooks due to it's weight but you don't want to put it in first or it will stick to the cake case.
5. Fill the cake cases to the top and bake in the oven for about 15 minutes (I have a gas oven so this may differ if you use an electric oven).
6. Leave to cool in the tins for a few minutes before transferring to a cooling rack.
7. Mix together the stork and icing sugar until you have a thick buttercream. 
8. Mix in the rosewater and colour really well so you have a consistent flavour and colour (if you don't own electric hand beaters/a mixer I would definitely invest in them if you plan to do lots of baking as this makes it SO much easier).
9. When the cakes are completely cooled use a piping bag and nozzle to pipe and swirl the buttercream on! Alternatively you could spread it on with a knife, making it as thick or thin as you want.
10. Sprinkle on some dark chocolate chunks and indulge!

I hope you enjoy making these as much as I did. I shared these out with several friends today and they seemed to hit the spot! My favourite reaction has to be when my friend's gorgeous little 16 month old girl opened the tin and said "Wow!"
xxx


Saturday, 20 October 2012

Man shall not live by bread alone...

...but it is rather yummy!
“If thou tastest a crust of bread, thou tastest all the stars and all the heavens.” --Robert Browning
I cannot imagine life without bread! It is definitely part of my 5 a day, and although my Grandma says it will give you a tummy ache, I love it hot and fresh from the oven, with real butter for a real treat!

This morning I have been baking some of Sarah Cook's Fruit and Spice Soda bread, which is now being devoured by my husband. I love how the oven works it's magic as a big doughy ball topped with sugar enters the oven, and emerges as a yummy loaf of bread! This recipe is really easy and quick to make, and the bread is delicious hot, cold or warm with jam, cheese, cold meat etc.! I love it with runny french cheese, apples and grapes. I have put both imperial and metric measure for this as although I like to work in ozs, reminding me of the balance scales my Mum had when I was a child, I know some people have moved on!
Fruit and Spice Soda Bread

100g/4oz porridge oats,
25g/1oz butter,
200g/7oz plain flour,
200g/7oz wholemeal flour, plus extra for dusting,
100g/4oz caster sugar,
1 tsp bicarbonate of soda,
1 1/2 tsp mixed spice,
1 tsp salt,
50g/2oz raisins,
50g/2oz sultanas,
50g/2oz stoned dates, finely chopped,
3 tbsp mixed peel,
450ml/16 floz buttermilk,
3-4 tbsp demerara sugar.

1. Heat the oven to 200/180 fan/gas mark 6.
2. Rub the butter into the porridge oats.
3. Stir in the flours, caster sugar, bicarbonate of soda, mixed spice, salt, raisins, sultanas, dates and mixed peel.
4. Pour over the buttermilk and quickly stir it in with a knife.
5. Tip it out onto a floured surface and bring together into a ball. 
6. Transfer to a flour dusted baking tray and scatter over the demerara sugar, gently pressing it into the top.
7. Use a sharp, flour dusted knife to mark a big cross in the top and bake for 30-35 mins until crusty on top.
Enjoy warm or cold, best thickly sliced!

Happy baking!
xxx


Friday, 19 October 2012

Ore-Ohhhh!!

A couple of weeks ago I enjoyed creating some chocolate cupcakes with Oreo cookie buttercream in the Yummy Mummy kitchen, and I have to say this buttercream is to die for!! More than a few teaspoons were tested (well you've got to make sure it's ok) and the extra bit I froze was defrosted again sharpish!! I adore Oreo cookies, I think it's the fact they are dark chocolate biscuits and there aren't that many of them out there. In my humble opinion it beats the Bourbon hands down. Well, you can only imagine my excitement when I heard that Cadburys and Oreo were teaming up to make a new bar, and when I finally got my hands on one today I was not disappointed! Although I would have hoped for the Cadburys chocolate to be a little thicker, the crunchy Oeros and creamy vanilla filling were perfect partners to my favourite purple bar. Needless to say... it didn't last long!

So, in the words of Carrie Bradshaw "I got to thinking.. what makes a perfect partner?" No, I'm not talking about the perfect man/woman in your life but the perfect combination of flavours! I love anything with peanut butter and chocolate (I think a Reeses cupcake creation may be in order soon). In fact I love anything, literally anything, with peanut butter (but that shall have to be a post for another day)! Some of my other perfect partners have to be:
  • Coffee and walnut,
  • Lemon and orange,
  • Peanut butter and jelly,
  • Cookies and cream,
  • Ginger and toffee, 
  • Peanut butter and Marmite (weird I know, never tried it in a cake but it's great on toast! Ok, I know you're sceptical but try it, trust me!)
  • Chocolate and coffee,
  • Cherry and almond,
  • Apple and almond...

What would be your perfect cupcake flavours? Comment at the bottom and I will put some ideas to the test in my Yummy Mummy kitchen very soon! 
xxx


Thursday, 18 October 2012

Please put a penny in the old man's hat!

Onwards with the theme of Christmas (I will stop soon as I think of what to do with my pumpkin innards!). My gorgeous Cath Kidston Christmas Organiser arrived in the post care of Amazon (£4.50 off RRP if anyone else wants one) and I tore it open with great excitement. I was not disappointed! Many things make me happy in life, and organisation and nice stationery come very highly. There are loads of lovely sections to organise presents, cards, guests, recipes and it comes with stickers too- bonus! This weekend I shall be getting it filled in with lots of ideas and jotting down the gifts I have bought/made already as well as special Christmas recipes of course.

The Christmas pudding has been steamed today by yummy Grandma and my little man and looks delicious, cannot wait to dig in on Christmas day. I went for Nigella's recipe from How To Be A Domestic Goddess, Baking and the Art of Comfort Cooking and here it is, it's a doddle!

The types of fruit are just a guide so you can change them to suit your tastes, maintaining the amounts though. Most of them should be able to be found easily in the Supermarket apart from marron glace pieces which will be more of a mission. I reckon Waitrose would be your best bet on the high street, I'm afraid I substituted them for more blueberries and cherries!

Christmas Pudding

100g currants,
100g mixed raisins and sultanas,
50g glace cherries chopped into quarters,
50g dried blueberries,
50g prunes, roughly chopped,
50g marron glace pieces, chopped,
60g candied peel,
150ml rum, (or other spirits, I used a mixture of sherry and Cointreau) 
90g self raising flour,
125g white breadcrumbs,
150 shredded suet, (beef or vege- I went for the latter)
1 quince/medium cooking apple grated,
150g dark brown sugar,
1/2 teaspoon mixed spice,
Pinch of salt,
Zest of 1 orange,
3 large eggs.

1. Soak all the fruit overnight in the alcohol.
2. Mix all the other ingredients together in a bowl, then add the soaked fruit.
3. Mix together thoroughly and make a wish! (This is a vital part of the pudding process!)
4. Butter a 1 1/2 litre pudding basin and put the mixture into it, alternatively you can use two smaller ones like we did.
5. Cover with a piece of greaseproof paper in which you have folded a pleat, and either cover with a lid or secure with a elastic band.
6. Boil or steam the pudding for 3 1/2 hours.
7. Once cool, turn it out and rewrap it and then find it a cool dark place to live until Christmas.
8. On Christmas Day steam for another 3 1/2 hours before serving, or do this part the night before and heat in the microwave on the day!

 I am SO looking forward to scouting out some more Christmas recipes to try over the festive season such as Gingerbread Cupcakes with Salted Caramel Buttercream.

This week I am on the hunt for the perfect thinly iced soft German gingerbread recipe to rival Lidls Gingerbread rounds which I think are the best around, and easily beat more expensive brands! They don't last long in our house so I would love to find a recipe to make some myself, let me know if anyone spots one!
xxx

Wednesday, 17 October 2012

Christmas is coming, the goose is getting fat!

Some of you may be thinking "Oh no, not Christmas already!" Well, bah humbug, I love it! I've been busy in the Yummy Mummy kitchen filtering some sloe gin and making some boxing day pineapple chutney. I love the smell of the house when I've been making chutney, defiantly feels like Winter is on it's way. And of course, chutney jars have to be properly dressed and I had a lovely time shopping with my little man yesterday for some Christmassy fabric and ribbons.


After Clare's suggestion we also had a go at making some Christmas Pudding Truffles based on Nigella's recipe (got to try these things ahead of time to check they are OK of course). If you like Christmas pudding, chocolate and sherry then you will love these bad boys and they are soooooo easy to make. You could easily leave out the sherry too if you are making them to share with children, pregnant friends or those with alcoholic tendencies (I'm naming no one....!)

Christmas Pudding Truffles

350g Christmas pudding, broken in pieces (you can either use leftover after Christmas or buy a shop bought one, chuck it in the microwave and leave to cool)
125g dark chocolate
 2 tablespoons of golden syrup
60ml of sherry (you could substitute this for another favourite festive tipple, Cointreau, Disarrano etc.) I would add it a bit at a time as I found the full 60ml left mine a bit sticky and would use less next time.

100g white chocolate
Either green and red icing pens or green and red glace cherries/angelica to be cut into holly and berry shapes (I went for the easier and less sticky option of icing)

1. Melt the dark chocolate in a bowl over a pan of hot water.
2. Stir into the Christmas pudding and add the golden syrup and sherry if using.
3. Mix together well until it can be formed into balls (I found it benefited from half an hour in the fridge before step 4).
4. Roll into 30 balls (I only got 20 and some didn't make it to the picture- greedy guts!) and put into the fridge to set.

5. Once they are set, melt the white chocolate in a bowl over a pan of water and dollop on the top to represent icing.
6. Return them to the fridge to set and then add your holly and berries (in less of a rush than I did mine!)
I found going back in the fridge over night helped them firm up better and they are delicious. A bite of one of these rich truffles really evokes the tastes of Christmas and they would make perfect gifts in little boxes, or be divine with coffee after dinner during the festive period!

And of course, a bit of Christmas baking isn't complete without stirring up the Christmas pudding. Stir Up Sunday isn't traditonally until the last Sunday before Advent but I think that Christmas puddings and cakes need longer than 4 weeks to really mature and is something we've always down at half term or in the weeks running up to it. A lovely afternoon was spent in Yummy Grandma's kitchen mixing up the Christmas pudding, helping my little man make a wish and getting it ready to steam. Brings back so many childhood memories of stirring the Christmas pudding with my Mum, so special to do it now with my little boy and his Grandma.
xxx