Friday, 30 November 2012

Ooooh la la!!

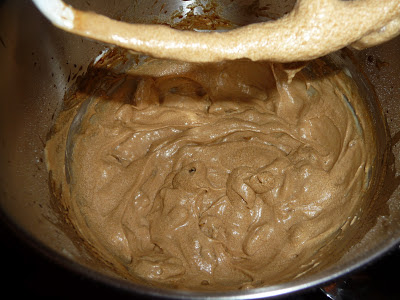
I finally got round to attempting macaroons and they are not as hard as they are thought to be at all. In fact I'm not sure why they have such a fierce reputation, as long as you accept that they aren't going to look perfect like the ones you buy in a Parisian patisserie! Here are my Strawberry and Cream macaroons!
I used Marian Keye's recipe from her book Saved by Cake. They are a 'flavourless' macaroon so you can flavour as well as colour it if you wish. I kept mine 'flavourless' and then used buttercream and strawberry jam to sandwich them together, but you could also use flavoured buttercream or cream.

Marian Keye's Macaroons
Depending on how big you want them, depends on how many this will make. I made 10 macaroons from this but they were BIG. I think I would aim for 15 next time!

2 egg whites,
150g/6oz castor sugar,
120g/5oz ground almonds,
120g/5oz icing sugar,
Food colouring and flavouring if required.

1. Line baking trays with baking paper and use a cutter and a soft pencil to draw circles to the size you require. Turn the paper over so that the pencil is on the bottom.
2. Whisk the egg whites until they make stiff peaks.
3. Add a tablespoon of castor sugar and whisk again. Keep adding the sugar and whsking until it is all mixed in.
4. Mix in the ground almonds, icing sugar, colour and flavour if using.
5. You can either use a plain nozzle and piping bag to pipe the macaroons onto the baking paper or a tea spoon. The piping bag will get them neater and more equal but if you haven't used one before then I would suggest a teaspoon and practice piping with buttercream first. Don't worry if they have pointy 'heads' on them, they will subside in the oven.
6. Leave them on the worktop for half a hour to form their crusty outsides!
7. Preheat the oven 150C/130C fan/gas mark 2.
8. After half a hour, bake for 25 minutes.
9. When they come out the oven, leave on the tray, on a wire rack for about 20 minutes. Then use a palette knige to gently lift them.
10. When they are completely cool, fill with your filling and imagine you are in a patisserie in Paris!

Let me know how you get on if you give these a go!!
xxxx

Tuesday, 27 November 2012

That's amore!

Today felt like a homemade pizza day and nothing beats my Mum's scone base pizza dough recipe. It is quick and easy to knock up, cooks brilliantly, holds up well to lots of toppings and tastes delicious. This is still a family favourite meal in our house and went down very well with my little man who had his own one too! I'm sure she won't mind me sharing the recipe with you!

Yummy Grandma's Pizza Dough

Serves a family of four (I made 2/3 of the recipe for us)

12oz/300g self raising flour,
4oz/100g Stork,
7floz milk,
Pinch of salt.

1. Rub the Stork into the self raising flour.
2. Add the milk and salt and mix together with a knife until you can bring it together into a ball. Knead gently.
3. Wrap in clingfilm and put in the fridge for half an hour.
4. Preheat the oven to 200/180 fan/gas mark 6.
5. Roll out on a floured surface, put onto a greased baking tray then top with whatever you fancy.
6. Bake in the oven for about 20 minutes until the cheese is bubbling and the crust is cooked.

My little man had a classic cheese and tomato (which he has some left for lunch tomorrow too) and we had caramelised balsamic onions (chop red onions and cook over a low heat for about 25 minutes in a frying pan with a splash of oil, slug of balsamic vinegar and spoonful of sugar), goats cheese and artichokes. Perfect for a quick and yummy tea on a rainy day! 

What's your favourite pizza topping? I think one day I shall have to try making a sweet pizza, saw someone do that on the TV the other day!!

Enjoy!
xxx

Monday, 26 November 2012

New kitchen, new Kitchenaid!!


We are finally moved and settled into our new house and I have a new oven (electric rather than gas that I’m used to) and my new Kitchenaid to explore (thank you gorgeous hubby!). I thought I would give it a whirl and make some little coffee and walnut cakes (a family favourite)! I am SO in love with my Kitchenaid and was amazed at it’s mixing pattern, definitely makes quick work of making cakes and looks so beautiful in the kitchen!! Need to adjust my beater height I think but other than that I think I have got the hang of it. I think I shall have to give her a name (ideas at the bottom of the page please!)…

Here is the recipe for my baking today if you want to give them a whirl! They are always demolished quickly in our house!

Yummy Mummy’s Coffee and Walnut Cakes

6oz/150g self raising flour,
6oz/150g Stork,
6oz/150g castor sugar,
3 eggs,
2 tsp of instant coffee,
75g chopped walnuts.

6oz icing sugar,
2oz Stork,
2 tsp of instant coffee.

  1. Preheat the oven to 200C/220C fan/gas mark 6.
  2. Mix the self raising flour, stork, castor sugar and eggs together.
  3. Boil the kettle and make up a small amount of strong black coffee with the 2 tsp of coffee (about 1/8th of a mug).
  4. Mix this quickly into the cake mixture and add the chopped walnut.
  5. Share between 12 cupcake cases and bake for 15-20 minutes until the top springs back when pressed.
  6. Whilst the cakes are cooling make the buttercream by mixing the icing sugar and Stork together. At this stage it will not be a smooth buttercream but should look more like breadcrumbs.
  7. Make up another small amount of strong black coffee with the 2 tsp of coffee (about 1/8th of a mug).
  8. Mix this into the buttercream and put into the fridge until it has thickened up a bit more.
  9. When the cakes are cooled, use a sharp knife to cut out the middle and fill with buttercream. Cut the cake you have removed in half to make little ‘wings’.

Instead of making these into butterfly cakes, you could make up 2-3 amounts of the buttercream and ice them as cupcakes! I took the quick option today I’m afraid as unpacking boxes was calling!!

I thought I would make a box for some of our new neighbours who kindly put a new house card through our letter box, welcoming us to the road. I hope they enjoy them!


Happy baking!
xxx

Thursday, 15 November 2012

On the move!

Hello readers! Apologies for the lack of posts over the next couple of weeks, we are FINALLY moving house so we will be busy packing and then waiting for the internet connection to be set up. As soon as we're in and unpacked though, baking will resume and I will post again as soon as I can!
xxx

Friday, 9 November 2012

Fridge cakes galore!

I am very blessed to have such lovely friends and family, and whenever we all get together, Mars Bar Cake, Tiffin and Millionaire's Shortbread are greatly expected, and Moira (Yummy Grandma) and Julie Ann (another Yummy Grandma) never let us down. They've kindly said I can share their yummy recipes with you, hope you enjoy them as much as we do!! They are all SO moreish...

Moira's Mars Bar Cake

10 snack size Mars Bars/6 normal size Mars Bars, chopped into pieces,
6oz/150g Stork/margarine,
6oz/150g Rice Krispies,

300g Cadburys chocolate.

1. Melt the Mars Bars and Stork in a saucepan over a low heat.
2. Stir in the Rice Krispies and press into a tin. When it has cooled a bit, put into the fridge to finish cooling for a few hours.
3. Melt the chocolate in a bowl over a pan of water, make sure that no steam gets into the chocolate or it will ruin it. Alternatively, you can melt the chocolate in the microwave, only put it in for short times, then stir it, to ensure you don't burn it.
4. Spread the chocolate over the set Mars Bar cake and return to the fridge until the chocolate has set.
5. Cut into pieces, little or large, and enjoy!


Julie Ann's Tiffin

1lb/400g digestive biscuits,
4 tablespoons of cocoa/drinking chocolate,
8oz/200g margarine,
4 tbsp golden syrup,

200g chocolate.

1. Crush the biscuits into fine pieces, either in a food processor, or put them in a bag and give them a good whack with a rolling pin.
2. Melt the margarine, cocoa/drinking chocolate and golden syrup in a saucepan.  
3. Stir in the crushed biscuits.
4. Line a tin (swiss roll tin ideally but other sizes will be fine) with foil and press the mixture into the tin. Leave to cool in the fridge.
5. When it has cooled, melt the chocolate and spread over the tiffin.
6. Return to the fridge to set and then turn out and peel off the foil. Cut into pieces and demolish!
This is best stored in the fridge!    

Moira's Millionaire's Shortbread
Technically it's not a fridge cake as you bake the shortbread but it spends lots of time in the fridge so thought I would get away with it!
   Base
5oz Stork,
8oz plain flour,
2oz sugar,

Caramel
1 small tin of condensed milk,
4oz Stork,
2oz soft brown sugar,
A few drops of vanilla essence,

Topping
300g Cadburys chocolate.

1. Preheat the oven to 180C/160 fan/gas mark 4.
2. To make the base, rub the Stork, plain four and sugar together until they resemble breadcrumbs. Then work into a dough and press into a long tin (approx 20 x 30cm).
3. Bake for 20-25 minutes until it is a pale golden colour, and still soft to the touch.
4. Put the condensed milk, sugar and margarine into a saucepan over a low heat, stirring all the time. Once it thickens, add the vanilla essence and then pour over the shortbread. Leave this to cool.
5. When the caramel is cooled, melt the Cadburys chocolate and pour it over the top of the caramel. 
6. Put it in the fridge until set, then cut into squares and devour!

I think I shall have to make one of these tomorrow, in the mood for chocolate (as always)
 Enjoy!
xxx

Thursday, 8 November 2012

When I am King dilly dilly, you shall be Queen...

Well, after leaving my lavender sugar to infuse I finally got around to making some lavender shortbread and was pleasantly surprised with the results! Shortbread is easy to make, but don't be tempted to rush the chilling stages as they help it firm up. However, don't leave it in the fridge over night as I did when I got distracted. I had to leave it all day to return to not far off room temperature! So, if you fancy having a go at making some, here's the recipe I used, although you could use any shortbread recipe, just replacing the castor sugar with lavender sugar instead.

Lavender Shortbread

125g/ 5oz lavender sugar, plus extra for sprinkling,
225g/ 8oz unsalted butter, softened,
300g/ 12oz plain flour (I used wholemeal plain flour as that is what I had in the cupboard, but either white or wholemeal is fine, the wholemeal just gives it a more rustic taste),
50g/ 2oz of ground rice.

1. Sieve the sugar into a bowl and reserve the lavender flowers to stir in later so they don't get broken.
2. Add the butter, and cream the butter and sugar together.
3. Sift the flour and ground rice into the mixture and add the reserved lavender flowers.
4. Mix with a wooden spoon until it resembles breadcrumbs.
5. Tip it onto a lightly floured surface and knead until it is smooth and forms a ball. Chill in the fridge for 15 minutes.
6. Roll the dough out to about 5mm thickness (I always end up thicker though!) and cut out shapes using a metal cutter.. Place onto a baking tray (you don't need to grease it, believe me there is enough butter in these that they won't stick!) and return to the fridge for 30 minutes.
7. Preheat the oven to 180C/160C fan/gas mark 4.
8. After half an hour, sprinkle with some extra lavender sugar and then bake for 15-25 minutes, depending on how thick they are, until golden brown. Cool on a wire cooling rack and sprinkle with some more lavender sugar before eating.

If you think the idea of eating lavender doesn't appeal to you then I really do implore you to try these, you might be pleasantly surprised! If anyone local to me wants some lavender sugar to try and make some let me know as I have some sitting in my baking cupboard!
Happy baking...
xxx

Wednesday, 7 November 2012

Bread, glorious bread!!

After getting lots of tips from Paul Hollywood on the Great British Bake Off, and bending my friend Dave's ear about bread, I thought I should give it a whirl. I haven't made bread properly for years, bar the odd pizza base, since the days of hedgehog rolls as a child! Over the last couple of days I've made some pizza rolls and a nice loaf of white bread, super easy, just need a bit of patience for the double proofing (the rising of the bread)! Considering how much bread our house gets through, I think I shall definitely be making more in the future!

I used the same dough recipe (actually off the side of the Sainbsury's strong white bread flour bag) for the bread and the rolls, just halved it when I made the rolls! I'm a great fan of all in one recipes so here we go...

Basic White Bread

500g/20oz strong white bread flour (make sure you don't use plain or self raising by mistake, it needs to be strong bread flour),
25g/1oz butter or 1 tbsp oil,
1 tbsp sugar,
1 1/2 tsp salt,
7g packet of fast action yeast,
320ml of warm water (run the hot tap for a few minutes to get the right temperature, don't use boiling water or you will kill the yeast. Cold water won't help it to activate).

1. Put all the ingredients into a bowl and mix with a knife until they come into a ball.
2. Knead the dough for ten minutes until stretchy. Cover the bowl in cling film and leave in a warm place until the dough has doubled in size.
3. When the dough is ready you should be able to pull it back from the side and see all the air pockets. Knead the dough again and form into whatever shape you want. Alternatively, grease a 2lb load tin and place the dough into that.
4. Leave again do the dough to double again in size. Preheat the oven to 220C/205 fan/gas mark 7.
5. Bake the bread for about 30 minutes, make sure you check it so the top doesn't burn.
6. Put on to a wiring cooling rack, tap the bottom, it should sound hollow if it is cooked through. 
 Pizza Rolls

Half of bread recipe above with oregano added to the dough at the start,
Passata/pasta sauce,
Cheese,
Any other fillings you like, you could use small pieces of ham, pineapple, pepperoni, mushroom, peppers etc.

1. Follow steps 1-2 of the bread recipe above.
2. Roll the dough out when it has double in size, try and get a sort of rectangle or you will have some mini rolls on the end, like mine!
3. Spread the dough with the tomato sauce and cover with the toppings.
4. Roll the dough up into a long sausage shape (hopefully a bit tidier than mine!)
5. Cut into slices and put onto a greased baking tray, with the joined side down. Leave to double in size. Preheat the oven to 220C/205 fan/gas mark 7.
 6. Bake in the oven for 20 minutes until the tops have started to brown. Enjoy warm, I think they taste great on their own, or with a salad or soup!

 
They were a big hit in our house and so simple to make! Will definitely be doing them again. 
Enjoy
xxx

Sunday, 4 November 2012

Chocolate indulgence cake!

I can only describe this cake as a complete and utter chocolate indulgence cake, definitely one for all the chocaholics (like myself) out there!! Decided to make this for Sunday family lunch, fingers crossed it will go down well! I can in no way claim that this cake is good for your waistline but I do think it is good for the soul, and a little piece goes a long way!

It is a super easy cake to make but looks delicious and impressive on the table. You just need 2 normal round cake tins as you then cut the cakes in half to get all the layers.

Yummy Mummy's Chocolate Indulgence Cake

8oz/200g self raising flour,
8oz/200g light brown sugar,
7oz/175g Stork,
4 large eggs,
2 heaped desert spoons of good quality cocoa (I always use Green and Blacks),
Splosh of milk (very technically measured, just to loosen the mixture after the addition of the cocoa),

500g chocolate (can be milk, white or dark, I used milk as baking for children and teens but you can use any, dark will be very rich),
500ml double cream,
Extra chocolate to decorate.

1.  Preheat the oven to 190C/170C/gas mark 5 and line the 2 cake tins with foil.
2. Mix together the flour, sugar, Stork, eggs, cocoa and milk and share equally between the 2 tins.
3. Bake for 20-25 minutes until the top springs back gently when you press it.
4. Break the chocolate into pieces and put into a saucepan with the double cream.
5. Heat gently, stirring often, until the chocolate has melted.
6. Pour into a bowl and whisk until it has thickened to the point where you can see where the beaters have just been (I won't lie, this took me about 15 minutes with an electric hand whisk, I cannot wait for my Kitchenaid to arrive!).
7. Put into the fridge to chill.
8. When the cakes are cooked, transfer them to a wire cooling rack and leave until they are completely cool.
9. When the cakes are completely cooled use a long sharp knife to cut each sponge in half. I would recommend cutting all around the edge of the sponge first, turning it on your hand, before cutting across the middle to get two even cakes.
10. When the chocolate ganache has set to the consistency of whipped double cream you can start to construct your cake, alternating layers of cake with dolloped on chocolate ganache.
11. Decorate with more chocolate and enjoy!

Happy baking!
xxx


Friday, 2 November 2012

Split icing bags!

Had a lovely afternoon with Yummy Grandma experimenting with split icing bags from Lakeland and I thought I would share my thoughts and tips! The kit comes with a few bags to get you started, some nozzles and a coupler for going into the split bag. The idea is that it creates two tone icing on your beautiful cakes!

The bags looks like normal icing bags until you pull them apart and find a clever extra section down the middle, giving you two sides for different coloured or flavoured buttercream. The coupler then splits in two, and a piece is put down each side of the bag and then secured!

Then you are ready to fill each side with your buttercream, we went for chocolate and rose, and lemon and vanilla. I found that whichever side you put in first goes down to the bottom easily, so when you put the second flavour in make you give it a good push down so that they both come out together!
The set comes with 6 different nozzles so you can create different designs. The nozzles are just plastic ones and are by no means as good as Wilton nozzles (my best and favourites!), but do create some lovely effects!
 
Happy piping!!
xxx

Thursday, 1 November 2012

Blondies vs. Brownies

Have spent a lovely time making blondies for the first time today! A lot of people think that blondies are white chocolate brownies, but traditionally they have no chocolate in it all and get a lot of their flavour from the brown sugar in them. The recipe I had a go at was Martha Stewart's Hazelnut Blondies as they are yummy! Her recipe is all in cups (American measuring cups in the picture to the right) but I have worked out the weights in imperial/metric for you if you don't own a set of cups (aren't I lovely!)

This recipe calls for chopped hazelnuts which you can either buy or whizz up yourself. When I was weaning my little boy I bought the Philips Hand Blender. Not only is it fab to whizzing up all sorts of food for your baby, the mini food processor is brilliant for quickly crushing up nuts, biscuits etc. to save getting a big food processor dirty.  

Martha Stewart's Hazelnut Blondies

4 tbsp butter,
2 cups/8.5ozs/240g all purpose flour (plain flour to us British bakers),
2 tsp baking powder,
1/2-1 tsp salt,
1 3/4 cups/12ozs/305g of light brown sugar,  
2 large eggs,
1 tsp vanilla essence,
1/3 cup/4oz/100g of chopped hazelnuts,
1 heaped tablespoon of Nutella, plus extra to serve (optional).

1. Preheat the oven to 180/260 fan/gas mark 4 and line a 8" by 11" tin with foil.
2. Melt the butter and cream with the sugar. 
3. Beat in the eggs and vanilla.
4. Mix in the flour, baking powder and salt.
5. Add the hazelnuts and nutella and mix well. (It makes quite a stiff mixture, like gingerbread). 
 6. Pour into the tin and bake for 25-30 minutes until the top is golden brown and a cocktail stick comes out when cleanly when inserted.
7. Leave to cool for 15 minutes before cutting into squares. If you want, top each piece with an extra bit of nutella, you could do this with a piping bag.

Overall, I think I still prefer brownies as I am a total chocaholic but blondies are a nice alternative for a less chocolatey day! My friend Dave, who I met when we did antenatal, and the lovely Alison, who I work with, make the BEST chocolate brownies! I will see if I can get one of their recipes for you...
Let me know where you stand on blondies vs. brownies! 
xxx