Monday, 1 December 2014

'Tis the season to eat mince pies...

Hello!
It has been SOOOOOOOOOOOOOOOOOOOOO long since I've blogged. Having 2 little men and working part time has kept me so busy, and not left a lot of time for baking, but I am aiming to rectify that. Today is the 1st of December so that means Christmas baking!!! I am doing my cake later in the week (post to follow) so today was all about mince pies. I decided to try some different toppings on mince pies after reading this recipe:

I made half the amount of pastry to make 12 mince pies, and also added some orange zest for some extra flavour. This pastry came together really well and was really easy to roll out thinly after it was chilled in the fridge, so I will definitely make it again.
I decided to try out the macaroon topping and used a piping bag to get as even as coverage as possible, but it doesn't pipe that evenly and will use a teaspoon next time to dollop it on. I halved the recipe as I was only making 12 rather than 24 but I found it was only enough to cover 6 mince pies!! Next time I will definitely double the amount of almond macaroon mix. 
Luckily, I always have some crumble topping on standby in the freezer so I spooned this on top of the others and voila- crisis averted! The crumble ones could have done with a few minutes more in the oven so will make them in separate trays next time, I'm going to make a few trays worth for the freezer over the Christmas season.
Cannot wait to tuck into my first mince pie of the season later on.


Let me know what festive treats you are baking up in your kitchen
xxx

Monday, 22 September 2014

Gingerbread!

It is definitely starting to feel Autumnal here in the UK, with chilly mornings and evenings and sunny afternoons. I of course, am thinking about Christmas already and have big plans for gingerbread house building so thought I'd share my favourite gingerbread recipe (I think it came originally from an old Dorling Kindersley children's cookbook, I'm sorry I can't remember which one) with you in case you have a gingerbread house to plan too. I'm going to use this template from BBC Good Food as I've heard good things about it:

Gingerbread

120z/340g plain flour,
4oz/115g butter,
6oz/175g soft, brown sugar,
2 tsp ground ginger,
1 tsp bicarbonate of soda,
1 beaten egg,
4 tbsp golden syrup.

1. Melt the butter, sugar and golden syrup in a pan over a low heat until melted. Leave to cool for a few minutes.
2. Mix in all the dry ingredients and egg nd combine until you get a wet dough.
3. Tear off a large piece of clingfilm and pour the dough into it and wrap it up. Put in the fridge for half an hour.
4. Flour a surface and turn out the dough. It is quite a wet dough so give it a good flouring on both sides before rolling it out. 
5. Preheat the oven to 190C and grease 2 baking trays.
6. Roll and cut out any shapes you like either using cutters or freehand. They will spread and puff a bit when cooking so leave spaces between them on the tray.
7. Bake for 10-15 minutes until lightly golden.
8. Leave to cool on a wire rack then ice if desired.

Hope you enjoy this scrummy Autumnal/Winter recipe as much as we do.
PS. The raw dough is delicious too!!
PPS. If you are planning on building a gingerbread house there are loads of fab ideas on Pinterest. As I'm making mine with a 3 year old I am not imagining it to look like this but we can dream!!
I love Gingerbread houses. They  make the  house smell so nice. I fell in love with at the Grove Park Inn in Asheville. They have a regional wide Ginger Bread House contest each year and there are some awesome creative ones there. Memories...
xxx

Sunday, 10 August 2014

Time for tea!


 The lashing rain and Autumny temperatures this morning put us firmly in the mood for toasted teacakes so I turned to this super easy Hairy Bikers recipe. If you have a mixer then you can really just throw everything in and let it do the work for you! We are going to enjoy ours toasted and buttered this evening. Here's a link to the recipe:
http://www.bbc.co.uk/food/recipes/spiced_teacakes_29429
_


Thursday, 24 July 2014

What's your favourite?

I have been busy having a sort out of my cookery books and thought I'd share a few of my thoughts on some of them with you. Here are some of the ones I use the most, but I have many more to work my way through too, including a very special Laduree Sugar book that I am going to really enjoy exploring when I have some free time. Let me know on here, or on my Facebook page what your favourite cookery books are, I'd love some new ideas!


Jane Bull- The Ultimate Cooking Book- I've had this book since I was a tween and have always loved books like this, full of fun recipes, loads of pictures and I love using ideas from this with my little man.

The Great British Bake Off- Turning Everyday Bakes into Showstoppers- I've not really explored this book yet as it all about making things look fabulous and with 2 little men I don't have a lot of time for fabulous baking, but I am looking forward to exploring it more in the future.

Dave Myers and Si King- The Hairy Dieters: How to Love Food and Lose Weight- I LOVE some of the recipes in this book. There are loads of low cal tasty meals, and they are easily adapted to veggies like us. My favourites are some of the Mexican inspired dishes as this is our favourite cuisine!

Delia Smith- Delia's Complete Cookery Course- We were given this book as an engagement present 8 years ago and often dip in and out of it. Although we don't often cook lots of 'posh' food or any meat it has lots of great, traditional recipes for things like pancakes, Yorkshire puddings etc.

Nigella Lawson- How to be a Domestic Goddess- This is a very well thumbed book full of yummy treats. I especially like the chocolate brownie recipe and the pineapple chutney. As I flicked through the other day I spotted a gingerbread tray bake made with black treacle that I'm going to try.

Paul Hollywood- Bread- I adore this book as Paul personally signed it to me!! Aside from that, what I also love about this book is that it is full of delicious and interesting bread recipes from all over the world, and after each recipe there is a full meal to use that bread in eg. naan bread followed by a curry recipe, tortillas followed by a mexican tortilla stack recipe. It makes you think about different ways to use bread in meals (not just for lunchtime sandwiches) and has a really wide variety of recipes to follow.

Paul Hollywood- How to Bake- Full of bread and cakes, I have used this book recently to make barm cakes and Christmas swirls. It has lots of easy to follow recipes with clear times for how long each recipe will take (as I'm sure you know bread making takes quite a while). Plus, it has the added bonus of pictures of the lovely Paul.

The Dairy Book of Home Cookery- This book is an oldie but a goodie! My Mum always had a copy of this when we were younger (and still does now) and it is packed with classic recipes for all sorts of cooking! I mainly use the baking section; flapjacks, bread and butter pudding, drop scones etc.

Mary Berry- Christmas Collection- I got this for a Christmas present last year so not had a chance to use it yet. Roll on Christmas so I can get some seasonal, jingly, candy cane bake on!

Marian Keyes- Saved by Cake- You may know that Marian Keyes is more well known as a chicklit author and coloumist but she is also a talented cookery writer. She wrote this book to help her through a period of depression and the book is full of feelgood recipes. I love the self saucing chocolate pudding that doesn't need cream or chocolate (uses cocoa) so can easily be made with cupboard ingredients!

Nigella Lawson- Kitchen- This is a massive book that I am still getting to know. I recently make Mexican lasagne from here which was yummy, and I know there are loads more recipes to try. I need to take some time to sit down and have a proper read through. I might just do that now....

Cathryn Dresser- Let's Bake!- This book arrived today and I am really excited by it. If you don't know Cathryn is a local to me, Mum of 2 who appeared on the Great British Bake Off. I have also met her a couple of times and she is lovely. It is aimed at baking with children and just having a quick flick earlier I have seen LOADS of recipes that I am going to try with my biggest little man. It is split into seasons with recipes suited to each time of year, and I cannot wait to work my way through them with my boy!
xxx


Tuesday, 8 July 2014

Cheesy, corny, chillie cornbread!

 Cornbread is one of my favourite breads, and today myself and the biggest little man made some with cheese, sweetcorn and jalapenos. It is so easy to make as you just chuck everything into the mixer, then spread it in a dish (it has the consistency of cake mixture) and bake until it's golden goodness is ready. Whenever I've looked around for cornbread recipes they often seem to have a lot of sugar in, which tastes a bit odd to me, but maybe this is traditional? I have settled on using this recipe now:
but I reduced the sugar to 1 tablespoon, then I added grated cheese and corn and topped it with jalapenos so I could take them off for the little men. If I was just making it for me and hubby I would put some in too. We had this tonight with sweet potato and chipotle soup, but it is also delicious baked on top of chilli like Nigella Lawson does or served alongside other mexican dishes.
xxx

Friday, 6 June 2014

Homemade toffee sauce!

I can't stand throwing away good food and am always looking for recipes to use things up. We are not big cream eaters in our house but at the moment you often get a free pot of double cream with a punnet of strawberries. As this pot of cream neared it's use by date I decided I better use it up sharpish, so with a few other ingredients I turned it into rich and indulgent toffee sauce, perfect for pancakes, ice cream and puddings. As a rule with making toffee sauces you want to use an equal amount of butter, sugar and syrup, or if you are using cream then reduce the amount of butter. I added a dash of vanilla too as I think it's yummy in everything, but you could leave it out if you'd rather.

Yummy Mummy's Toffee Sauce

75g Stork (or you could use butter),
150g light brown sugar,
150g golden syrup,
1/2 tsp vanilla extract,
150ml double cream.

1. Put all the ingredients in a pan and heat until the butter has melted and they have combined. Bring to the boil.
2. Boil rapidly (like you do with a jam) for 4 minutes, stirring constantly so that it doesn't stick or burn. It will be very hot but shouldn't be spitting at you, if it is then turn it down.

3. Pour into a bowl to cool. It will still be quite runny but will thicken as it cools. Don't be tempted to sneak a spoonful too soon, it is very hot and will burn your tongue (lesson learnt!).

This sauce can then be refrigerated or frozen for another day! Perfect on a ice cream sundae in the sunshine!
xxx

Tuesday, 3 June 2014

Perfect chocolate chip cookies!

I feel like I have stumbled upon some sort of Holy Grail this afternoon; the perfect chocolate chip cookie, perfectly crisp on the outside, with a soft, squidgy interior, packed full of chocolate. I have used many cookie recipes and never found one that made these perfect cookies, until today! The recipe is in American cups so I have used Delia's conversion chart to put the weights in grams and ozs, but I have not tested these measurements! Next time I make them I will use cups but weigh as I go so I can guarantee the conversion! If you try it before me then let me know! NOTE: I have now weighed this recipe as I've made it and put in brackets the weights in grams for anyone who doesn't own American cups.
This is the original recipe that I worked from:

So anyone, without further ado, here we go...

Perfect Chocolate Chip Cookies

2 cups (320g) all purpose/self raising flour,
1/2 tsp baking powder,
1/2 tsp salt,
3/4 cup (130g) Stork, melted.
1 cup (170g) packed brown sugar,
1/2 cup 100g) caster sugar,
1 tsp vanilla extract,
1 egg,
1 additional egg yolk,
2 cups (350g) (I did say they had a lot of chocolate in!) chocolate chips.

1. Preheat the oven to 325F/170C.
2. Measure all of the dry ingredients apart from the chocolate chips into a bowl or mixer. Add the egg and additional egg yolk.
3. Melt the Stork (I did this in the microwave in 15 second bursts). Allow to cool slightly.
4. Add the Stork and chocolate chips and mix until you have a thick dough you can pick up and roll into a ball. At this stage me and little big man did quite a bit of tasting!!
5. Wrap in clingfilm and refrigerate for 30 minutes.
6. Unwrap the dough and roll into balls, spreading them out on ungreased baking trays. I made 24 cookies from the dough, post snaffling!
7. Bake for 15 minutes until just starting to brown, don't leave them in too long or the middles won't have the yummy gooeyness.
8. Leave on the baking trays for 5 minutes then remove to a wire rack and enjoy with a glass of cold milk!

Hope you LOVE these cookies as much as I do, I can now be 'that Mom' when my boys start school who makes amazing cookies for when they come through the door!
xxx

Monday, 19 May 2014

Let's bake well!

A family favourite of ours is Bakewell Tart, something we usually buy and have never made before so I decided to rectify that. I used Mary Berry's recipe here:


and adapted it slightly. I made a bit more pastry than needed as a pastry amateur, and just used the leftovers to make mini jam tarts. I also left out the flaked almonds and icing drizzle on top and covered ours with a thicker layer of icing and half glace cherries! I would recommend watching the video on the link about blind baking if you haven't done it before (plus it's Paul, so good time for an ogle). Here's a few pics of mine in progress:
 'Breadcrumbs' for pastry
'
 Pastry lined tin with a few bits of patching up
 Big little man patting down the baking beans
 Filled tart- think I may have used a little too much jam!!
 My tart after 22 minutes, so glad I checked it as any longer and we would have been in BIG trouble. Recipe says 35 minutes to bake, check yours lots!!
Topped with icing and cherries!

Mmmmmm
xxx

Tuesday, 13 May 2014

Tricolor bread!

I adore freshly baked bread and today fancied baking something a bit different so I did a bit of googling and stumbled upon this recipe:

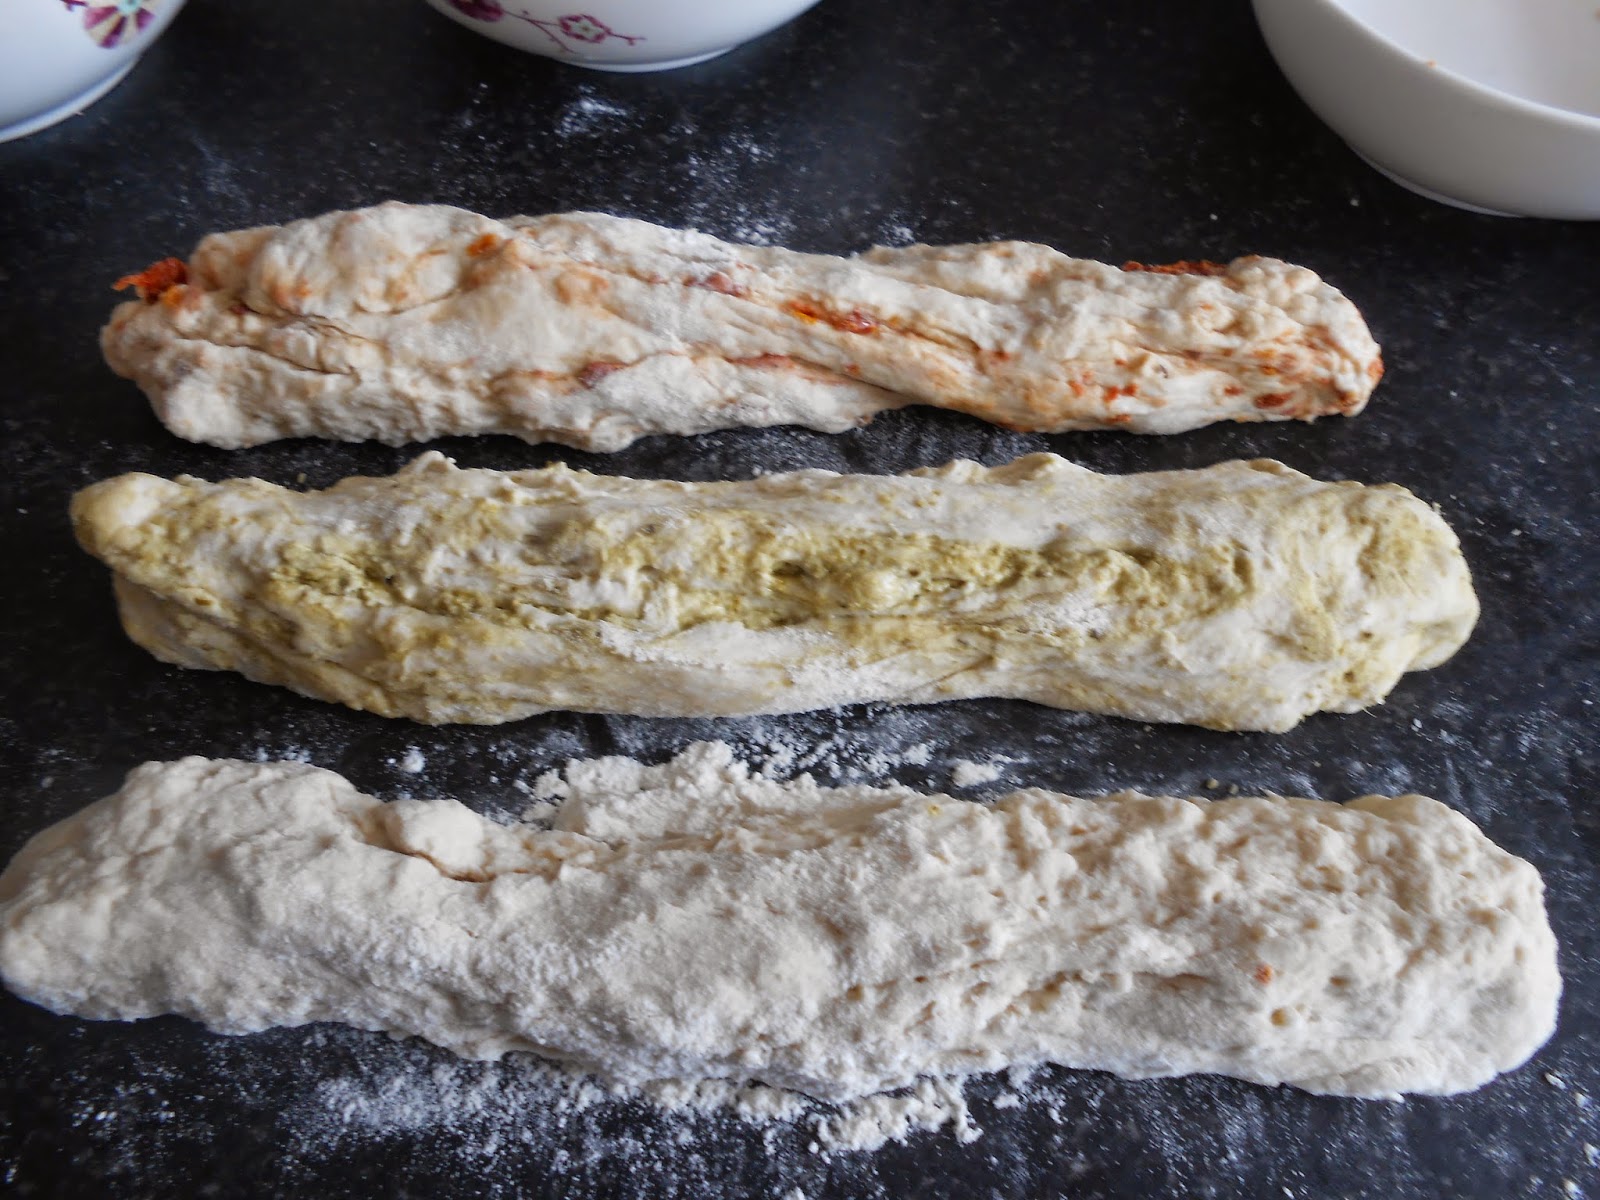
I then adapted it to make my own tricolour bread with sundried tomatoes, pesto and garlic. It is a really soft and delicious bread, bursting with flavours!

Yummy Mummy's Tricolour Bread
Makes 1 large loaf

500g strong bread flour,
7g (1 sachet) of fast action dried yeast,
15g butter,
1 1/2tsp salt,
1tsp sugar,
300ml warm water,

10 sundried tomatoes, chopped into small pieces,
2 heaped tsp pesto,
2tsp chopped/crushed garlic.

1. Mix together the bread flour, yeast, butter, salt and sugar. Knead for several minutes until you have a smooth and stretchy dough. Cover and leave in a warm place to rise for about 45 minutes.
2. Knock the dough back and seperate into 3 equal balls.
3. Knead the sundried tomatoes into 1 ball, the pesto into another ball and the garlic into the third ball. Roll into long sausage shapes.
4. Plait the 3 strands of dough together, tucking the ends under. Try and plait with an even tightness all down the loaf, you can see on my finished loaf I plaited tighter as I got near the end, ooops! 
5. Place onto a non stick tray and cover. Preheat the oven to 210C. Leave the loaf to rise for about 45 minutes.

6. Brush the top of the risen loaf with milk, then bake at 210C for 15 minutes. After 15 minutes turn the oven down to 180C and leave to bake for a further 20 minutes until golden on top. The loaf should sound hollow when you tap on the bottom.
7. Leave to cool on a wire rack then enjoy!

xxx

Thursday, 1 May 2014

Mmmmmmm doughnut muffins...

I find food innovations fascinating and am determined one day to try a cronut (croissant meets doughnut) and a slice of pizza cake (think several pizzas stacked up and cut like a cake- my husband thinks it sounds grim). I guess these should really be called duffins or muffnuts (not sure on that one!!). Anyway, I've had this recipe knocking about the kitchen for a while now and finally got round to trying it today, and boy, I was not disappointed:


These doughnut muffins are so delicious warm from the oven and do really taste like hot doughnuts from Brighton pier, with added yummy jam, and not a deep fat fryer in sight!

A couple of things I found that might help you out:

  • I used a Pyrex jug to pour the batter into the muffin tin and found this helped make less mess.
  • I found that I only had enough batter for 10, rather than 12, I probably need to be a bit less generous with it!
  • The recipe says to use 7oz of sugar to roll them muffins in but I found I didn't need anywhere near that amount, I would start with 4oz and add more if you run out.


Time to add the jam!
Covering over the jam (stealing batter from 2 of them- I did clean them out before baking or it would have been an awful, burnt mess!)
Ooops, one fell apart when I took it out the tin- chef's perks!

Happy baking!
xxx

Wednesday, 23 April 2014

Monkey muffins :) x

My little monkey LOVES to bake so today we whipped up a batch of my Monkey Muffins, These are so simple to make, taste delicious and freeze well too (if they last long enough to make it to the freezer). Little hands can help squishing bananas up and putting cake cases into the tin, whilst bigger ones can help with weighing and measuring. These muffins are great with a cup of tea in the afternoon, but equally yummy for breakfast on-the-go!

Yummy Mummy's Monkey Muffins
Makes 12 'cupcake' size muffins

7oz self raising flour,
1 egg,
1/2tsp baking powder,
Pinch of salt,
3 large very ripe bananas, mashed,
5oz soft brown sugar,
2.5oz Stork, melted,
3oz walnuts (if you are baking these for small children then either leave out the walnuts or make sure they are a safe size for your child to eat, you can smash them up a bit or blend in them in a food processor to be fine so you get all the walnut flavour without the choking hazard. It is recommended not to give whole nuts to under 5s as they can be a choking hazard. If you're baking for grown ups then walnut pieces are delicious in these).

1. Preheat the oven to 180C/gas mark 4. Put 12 cupcake cases into a muffin tin.
2. Mix all of the ingredients together in a bowl.
3. Spoon into the cases equally and bake for 20 minutes until lightly golden on top.

I like these still warm from the oven, as does my little big man, ooops!

xxx

Saturday, 19 April 2014

One a penny, two a penny...

One of the many wonderful things about Easter has to be hot cross buns, and our family have been eating them in abundance; a toasted buttered hot cross bun half is one of big little man's favourites at the moment. Today we had a couple left over that were on the stale side so I whipped this up to use them up after our roast dinner. You could easily make this recipe with bread instead (increasing the added sugar and fruit), add other dried fruits or chocolate, and double it to feed more! The good thing about this recipe is that you will probably have most of the ingredients already in your kitchen and it is healthier than some alternatives made with double cream. I like this best served with warm custard!!

Yummy Mummy's Hot Cross Bun Bread and Butter Pudding
Serves 4

2 hot cross buns split and spread with real butter,
1/2 pint of milk,
1 egg,
3 desertspoons of sugar,
3 desertspoons of sultanas.

1. Heat the oven to 160C.
2. Place the buttered hot cross buns into a dish (try and use one that they will nearly fill up).
3. Measure out the milk and break the egg into the measuring jug. Mix to combine them (there will be yellow bits floating around in the milk, it doesn't look that appetising at this stage).
4. Sprinkle the sultanas over the hot cross buns.
5. Pour over the egg and milk mixture and squish the hot cross buns down under the surface of it.
6. Sprinkle over the sugar and leave to stand for half a hour so that the hot cross buns can absorb some of the liquid.
7. Bake for 30-40 minutes until golden brown on top.

If you fancy having a go at making your own hot cross buns then I would recommend this recipe from Mr Hollywood:

xxx

Thursday, 17 April 2014

Baking with Big Little Man: Chocolate Crispy Cakes

Children love baking and it's great for them to learn lots of skills; counting, weighing, measuring, rolling, cutting, kneading, patience and self restraint!!! My little big man is working on the last one still and sometimes speed and distraction is of the essence, but nevertheless he is one of my favourite baking partners. Today we made chocolate crispy cakes with eggs on for Easter, these are so easy to make and I have included 2 different recipes depending on whether you like yours as more solid, chocolately cake or a chewier cake.

Yummy Mummy's Chocolate Crispy Cakes
Makes 24 fairy cake size.Can be easily halved, or doubled for a party.

For a solid crispy cake:
250g chocolate,
125g rice krispies.

For a chewier crispy cake:
75g Stork,
2tbsp golden syrup,
250g chocolate,
125g rice krispies.

Sweets to top them with, we used Cadburys pebbles that look like eggs as we couldn't find mini eggs anywhere today, but you could use any sweets you like, jelly beans are very nice!

1. Melt the chocolate. I do this in the microwave in short bursts then stirring to avoid burning it. Alternatively you can melt it in a bowl over a small pan of water, making sure that no water or steam gets into the chocolate.
2. If you are using the Stork and golden syrup then melt them in a saucepan and leave to cool for a few minutes. Stir in the chocolate.
3. Stir in the rice krispies and spoon into cake cases in a cake tin. Top with sweets and then put in the fridge to set.

Happy Easter and many blessings
xxx

Sunday, 6 April 2014

Magic Rainbow Cake!

My Mum is simply amazing, so she deserves a special magical birthday cake! I decided to make her a magic rainbow cake covered in chocolate fudge frosting and here is the recipe if you want to make your own. It is not technically difficult to make AT ALL but is quite time consuming as there are lots of layers to colour and bake, but does look very impressive. I warn you now, this cake is big (equivalent of 4 single sponge cakes) so it's perfect for a party, and is definitely a 'fork cake'. As it is completely covered you can keep it a secret as to what the cake is inside, so it's a lovely surprise when you cut the first slice!

Yummy Mummy's Rainbow Cake

1lb self raising flour,
1lb castor sugar,
1lb Stork,
8 eggs.

Food colourings for all the rainbow colours- I used Wilton gel colours, I would really recommend gel colours of you won't get bright, vibrant sponges.

2 tubs of Betty Crocker's chocolate fudge frosting (you could do any other frosting you fancied; ganache, cream cheese etc.)

1 sharing pack of M & Ms (you won't quite need all of them but I'm sure your mouth can help you out!)

1. Preheat the oven to 190C.
2. Mix together the self raising flour, castor sugar, Stork and eggs.
3. Divide equally into 7 bowls and then colour to rainbow colours. I did red, orange, yellow, green, blue, pink and purple. If you don't have all the colours you can mix them like paint.
4. Line cake tins with foil, if you have 4 cake tins then this will make it a lot quicker for you to bake but they can easily be done in smaller batches. 
5. Bake each cake for 14-18 minutes until a skewer comes out cleanly. Your oven may take a different amount of time so keep a close eye on the first batch so you know how long later batches will take. Remember they are just over half the size of a single sponge so will cook quicker and be thinner.
6. As they come out the oven leave to cool in the foil for a few minutes before peeling off the foil very carefully and leaving until completely cool.
7. To assemble the cake put a little blob of the frosting on your cake plate then put on the first sponge. Top with chocolate fudge frosting, then repeat until you get all the way to the top layer. Cover the top and sides in chocolate fudge frosting then top with M & Ms.


Share and enjoy the magic of the rainbow cake, makes me think of sparkles and unicorns!
xxx

Saturday, 15 March 2014

Battenburg Cupcakes!

Very busy day baking today for my littlest man's Christening but I couldn't resist creating a new cupcake, and here it is; my Battenburg Cupcake! It is a really easy cupcake to make and I think it looks really cute. I hope they do down well tomorrow!

Yummy Mummy's Battenburg Cupcakes
Makes 12

Cakes:
6oz/150g self raising flour,
6oz/150g castor sugar,
6oz/150g Stork,
3 large eggs,
3 tsp of almond extract,
Pink food colouring.

Buttercream icing:
6oz/150g Stork,
12oz/300g icing sugar,
1-2 tsp of almond extract,
Yellow food colouring,
3 mini battenburgs (I used Mr Kiplings).

1. Preheat oven to 190C/gas mark 5.
2,Mix together the self raising flour, castor sugar, Stork, eggs and almond extract. Separate the mixture into 2 equal amounts.
3. Colour one half pink and leave the other half plain.
4. Spoon 1 tsp of pink cake mixture and 1 tsp of plain cake mixture into the bottom of each cake case.
5. Repeat on top, putting pink on top of plain and plain on top of pink. This should give a sort of 'battenburgy' look then when cut/bitten.
6. Bake for 15-20 minutes until springy on top.
7. Leave to cool completely.
8. Mix together the Stork, icing sugar, almond extract and yellow food colouring together to make the buttercream.
9. Use a piping bag and nozzle to pipe the icing on in swirls, or you could use a knife to spread it on if you prefer.
10. Cut thin slices of mini battenburg and pop on top!


Voila!
xxx

Thursday, 27 February 2014

Cake truffles!

These cake truffles are really quick to put together and perfect for a girlie night in. You could easily play about with the flavours, I used a chocolate cake and rose buttercream but you could change the flavour of the cake and buttercream and also add a dash of alcohol if you fancy. I coated mine in Cadburys chocolate as it is my absolute favourite, but again, you could use any brand; dark, milk or white.

Cake Truffles

1 layer of cake (I used devil's food cake, recipe here:  http://yummymummy2012.blogspot.co.uk/2013/10/devils-food-cakesinful.html)
2oz Stork,
4oz icing sugar,
Flavouring (I used 2tsp of rose water),
250g chocolate (this was a little more than I needed and left me with a few spoonfuls of melted chocolate to enjoy at the end- chef's perks!)

1. Crumble the cake until it resembles breadcrumbs.
2. Mix together the Stork and icing sugar to make buttercream. Flavour it and if you are using a 'white' cake you can add colour too (I coloured mine anyway even though I used a chocolate cake as it felt wrong being rose flavour without being pink! I'm weird, I know!),
3. Mix the buttercream into the cake crumbs until it becomes thick and you are able to roll it into balls. Make as many balls as you like, I found a teaspoon of the mixture was a good size but they can be as big or small as you want.
4. Put onto a baking tray lined with foil and leave in the fridge for a while to harden up a bit.
5. Melt the chocolate in a bowl and then coat each ball in chocolate. I used 2 forks to help drain off excess chocolate. Top with any decorations you want, I used miniature pearls.

Can't wait to tuck into these with the girls tomorrow night!
xxx